1. Preamble
This guide is intended for users that want to understand, install and use the Tensei-Data system. It is also feasible for administrators that strive for a better understanding of the system components.
- Version
-
29a47a6a197c1cd8f8f57403368edd37ddda79c3-SNAPSHOT
Copyright (c) 2014 - 2017 Contributors as noted in the AUTHORS.md file

The Tensei-Data user guide is distributed under the terms of the
Creative Commons Attribution-ShareAlike 4.0 International license
(CC BY-SA 4.0).
1.1. Authors
The following authors contributed to this guide:
Corporate Contributors
======================

- Copyright (c) 2014 - 2015 Wegtam UG (haftungsbeschränkt)
- Copyright (c) 2015 - 2017 Wegtam GmbH

Individual Contributors
=======================

- Jens Grassel
- André Schütz
1.2. Contributing
If you want to contribute to the project, you should follow the following Contribution Guide that has been adopted.
# Contribution Guide

This project has adopted the [Collective Code Construction Contract
(C4.2)](https://rfc.zeromq.org/spec:42) for contributing. Please read it
before sending patches.

Everyone is expected to follow the
[Scala Code of Conduct](http://www.scala-lang.org/conduct.html) when
dicussing the project on the available communication channels.
If you are being harassed, please contact us immediately so that we can
support you.

### Additions to C4.2

1. This project is licensed under Creative Commons Attribution-ShareAlike 4.0
International license (CC BY-SA 4.0). See [LICENSE](LICENSE) for details.

2. Contributors are listed in the file [AUTHORS.md](AUTHORS.md). Add
yourself if you have contributed.

3. Please maintain the existing code style and try to keep your commits
small and focused.

4. Please rebase your branch if the project diverges from your branch.

5. Before a pull request is merged the commits done on the feature branch
SHOULD be squashed into a single commit.

6. Changes are documented in the file [CHANGELOG.md](CHANGELOG.md). Please
use the section `Unreleased` to note your changes.

## Release Guide

The changes in the section `Unreleased` in the [CHANGELOG.md](CHANGELOG.md)
file MUST be moved to a section named after the release and a new empty
`Unreleased` section MUST be created.

A release SHALL be accompanied by an annotated tag (`git tag -a NAME`) that
holds a description of the changes that are included in the release. This
description SHOULD be same as in the file [CHANGELOG.md](CHANGELOG.md).
2. Overview
The Tensei-Data software system can be used to merge, standardize and simplify data integration, data migration, data transformation and interface management processes.
These processes can be manually executed or automatically by specified routines or triggers that are monitored.
The system is based on modern technologies like Akka, Scala and the
Play Framework. Therefore, the application is scalable, flexible and highly
performant.
The integrated Data Description Language (DFASDL) allows the dynamic
mapping of almost any source and target system and is called within the
application as dynamic connectors.
For the modification of data, the Tensei-Data application offers diverse
transformers which can be combined and modified.
2.1. Features
Key features of the Tensei-Data system are:
- Dynamic Connectors
-
The structures of the source and the target system can automatically be retrieved and expressed via the integrated Data Description Language (DFASDL). That allows the connection of standardized and individual resources.
- Referential Integrity
-
Existing dependencies (Primary keys, Foreign Keys) between the data are automatically considered and integrated into the target system. That preserves the correctness of the referential integrity when depending keys are changing.
- Normalization
-
Normalization allows the extraction of data from the source system and avoids redundancies in the target system. Tensei-Data extracts the data depending on the specifications and provides the created dependencies for the linking of the dependent data.
- Virutal Views
-
Tensei-Data allows the creation of virtual views on the existing data which create new relations and aggregations.
- Transformers
-
A row of basic transformers are already included in the Tensei-Data system to modify the data in diverse ways. Multiple transformers can be connected in series to execute various modifications on the data. This flexibility enables endless ways to transform data regarding diverse use cases.
- Automatic Execution
-
The execution of the integration and transformation processes can be established continuously or manually. For the continuous execution are Cronjobs (time-based execution) or Trigger (event-based execution) available.
- Scalable
-
The system is based on a modern software stack of Scala and Akka. The advantages of this agent based system are scalability by the Akka cluster and parallelization that can be upscaled depending on the number of available agents.
- Diverse database systems and file types
-
Tensei-Data supports various databases and file types and provides connection out of the box.
Additional features are:
-
Automatic description of the data structure
-
Complex integration tasks can be subdivided into subtasks and automatically executed
-
Besides the graphical frontend exists an admin mode that allows the specification of database dependent queries
-
Filtering of data
-
Export / Import of existing cookbooks for reuse
-
Intuitive mapping visualization
-
Extreme short training periods
2.2. Objectives
The Tensei-Data application is designed with the following objectives in mind:
-
Integrate, migrate and transform data with ease
-
One platform for all data transformation and integration processes
-
Reduce errors during system setup
-
Easy adaptation of the application to new requirements
-
Scalability
-
Reusability
-
Minimal training periods
2.3. Database and file type connections out of the box
| Databases | Files | File access |
|---|---|---|
Derby |
Text |
Local |
H2 |
CSV |
Http |
HypeSQL |
XML |
FTP |
Firebird |
Excel |
FTPS |
MariaDB |
JSON |
SFTP |
Microsoft SQL Server |
||
MySQL |
TSV |
|
Oracle |
||
PostgreSQL |
||
SQLite |
||
others (via JDBC) |
2.4. Structure and Components
Tensei-Data is designed as microservice application structure and consists of the following components:
- Frontend
-
Administer the Transformation Configurations for executing the integration and transformation processes. The graphical editor allows the definition and adaptation of all process relevant steps.
- Server
-
Administer the connection between the frontend and the registered agents.
- Agent
-
Agents are the workhorse of the Tensei-Data system and finally execute the Transformation Configurations.
3. Installation
The installation of the Tensei-Data system can be done by using a Virtual Machine for Windows, a Virtual Machine for Linux or the installation of Debian packages.
3.1. VM
The minimum requirements for the Virtual Machine are as follows:
CPU |
4 cores or more |
RAM |
3 gb memory or more |
HDD |
sufficient space on hard disk (at least 12 gb) |
VirtualBox |
The virtualisation software VirtualBox [1] needs to be installed. |
Vagrant |
Vagrant [2] needs to be installed. |
SSH |
Alternatively Git [3] |
3.1.1. Windows
The following steps describe the installation of the required components to execute the Tensei-Data system.
Installation of VirtualBox
VirtualBox is a virtualization software that is available for various systems.
-
Download the
Windows Installerfrom https://www.virtualbox.org/ -
Execute the
Installerand follow the instructions
Installation of Vagrant
Vagrant is used to create the system that executes the Tensei-Data components.
-
Download the
Windows Installerfrom https://www.vagrantup.com/ -
Execute the
Installerand follow the instructions
| The system must be rebooted after installing Vagrant. |
Installation of the Tensei-Data Demobox
-
Create an empty folder.
-
Open a command prompt in the created folder.
-
Enter the command
vagrant init wegtam/tensei-demoat command prompt.
To start the demo version a command prompt has to be opened in the created· directory. At the prompt the following command starts the demo version:
vagrant up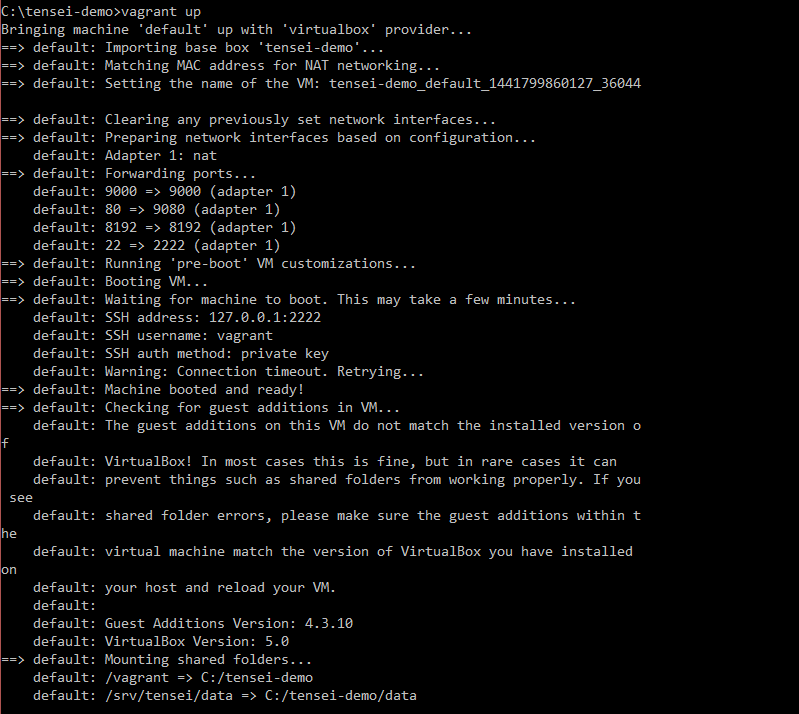
-
The first start of the system takes a while.
-
You can access the system at http://localhost:9000
-
You can stop the system with
vagrant halt
-
If you have problems during the start, you have to start the processes by hand: FAQ Installation
-
The demo is installed and can be restarted with
vagrant up
3.1.2. Linux
-
Create an empty folder.
-
Open a command prompt in the created folder.
-
Enter the command
vagrant init wegtam/tensei-demoat command prompt.
To start the demo version a command prompt has to be opened in the created· directory. At the prompt the following command starts the demo version:
vagrant upAfter the VM has started the application, the frontend is available under the following address: http://localhost:9000
The first booting of the virtual machine may take longer because the vagrant box must be decompressed and installed.
If the following error message Server connection unavailable
appears on the screen, the services must be started manually.
Services do not start
|
The VM can be shutdown via vagrant halt or via vagrant suspend. To
boot it again just use the vagrant up command.
The virtual machine will not shutdown automatically with the shutdown of the host system. The VM may be damaged if it is not shutdown properly.
-
If you have problems during the start, you have to start the processes by hand: FAQ Installation
3.1.3. Replace an existing Vagrant-Box
If you want to replace an existing Vagrant-Box, you must execute the following steps.
| If you want to keep existing Cookbooks, you must export them. |
-
Switch to the folder where the actual Vagrant-Box is installed
-
You can see the status of the box with
vagrant status -
Destroy the box with
vagrant destroy -
List the added boxes with
vagrant box list -
Delete the actual Vagrant-Box with
vagrant box remove NAME-OF-THE-BOX-
If the box has the name
tensei-demo, the box can be removed with the following line:vagrant box remove tensei-demo
-
-
Install the new box like described in the Installation.
3.1.4. Uninstall
For a properly uninstallation of the application the command vagrant destroy
has to be executed. Afterwards the working directory may be deleted.
In C:\Users\<username>.vagrant.d\boxes\ (Windows) or
/home/<username>/.vagrant.d/boxes/ (Linux), a copy of the VM is stored that
can be removed manually.
|
3.2. Manually
3.2.1. System requirements
The hardware requirements match those of the VM. In addition to that the following software requirements have to be fullfilled:
3.2.2. Preparing the installation
If all requirements have been installed the database has to be prepared. The following sections describe the steps needed for that.
Create user accounts
If each component should be run with an individual user account then these accounts have to be created.
The system consists of the following components:
-
Server
-
Agent (At least 1 agent is needed.)
-
Frontend
3.2.3. Tensei-Server
The server component is delivered via a file called tensei-server.txz.
This file has to be extracted at the desired execution folder. During
extraction a folder like tensei-server-A.B.C will be created. For
convenience this folder should be renamed to tensei-server.
The subfolder conf contains several configuration files including the
file logback.xml which can be used to adjust the logging.
Start script and parameter
The start scripts are located within the subfolder bin:
-
tensei-server -
tensei-server.bat
According to your operating system you have to chose the proper file
(for example tensei-server.bat for a Windows system). To start the
application several parameters have to be set. These are explained in
the following section.
| Name | Required? | Description | Recommendation |
|---|---|---|---|
|
Yes |
||
|
Yes |
The path to the logback configuration file. |
|
|
Yes |
The path to the server configuration file. |
|
|
The minimum value of memory that should be allocated for the server. |
400 bis 500 MB |
|
|
The maximum value of memory that should be allocated for the server. |
400 bis 500 MB |
bin/tensei-server -J-server -J-Xms384m -J-Xmx384m·
  -J-Dlogback.configuration=conf/logback.xml·
  -J-Dconfig.file=conf/application.conf
The parameters can be set permanently via in the file
conf/application.ini.
|
3.2.4. Tensei-Agent
The Agent is the "work horse" of a Tensei-Data system. It is delivered
via a file called tensei-agent.txz.
This file has to be extracted at the desired execution folder. During
extraction a folder like tensei-agent-A.B.C will be created. For
convenience this folder should be renamed to tensei-agent.
The subfolder conf contains several configuration files including the
file logback.xml which can be used to adjust the logging.
Start script and parameter
The start scripts are located within the subfolder bin:
-
tensei-agent -
tensei-agent.bat
According to your operating system you have to chose the proper file
(for example tensei-agent.bat for a Windows system). To start the
application several parameters have to be set. These are explained in
the following section.
| Name | Required? | Description | Recommendation |
|---|---|---|---|
|
Yes |
||
|
Yes |
The path to the logback configuration file. |
|
|
Yes |
The path to the agent configuration file. |
|
|
The minimum value of memory that should be allocated for the agent. |
at least 512 MB, depending on available hardware as much as possible |
|
|
The maximum value of memory that should be allocated for the agent. |
at least 512 MB, depending on available hardware as much as possible |
|
|
Determines how much additionaly memory should be allocated if the
value defined by |
at least 512 MB, better are 1-2 GB |
bin/tensei-agent -J-server -J-Xms4g -J-Xmx4g -XX:MaxMetaspaceSize=1g
  -J-Dlogback.configuration=conf/logback.xml·
  -J-Dconfig.file=conf/application.conf
The parameters can be set permanently via in the file
conf/application.ini.
|
Upon the first start a file tensei-agent-id.properties will be
created in the agent user’s home directory if it doesn’t already exist.
Within this file the ID of the agent can be configured if this is
desired.
|
3.2.5. Frontend
The frontend provides the user interface and some additional
functionality like cronjobs and trigger.
It is delivered via a file called tensei-frontend.txz. This file has
to be extracted at the desired execution folder. During extraction a
folder like tensei-frontend-A.B.C will be created. For convenience
this folder should be renamed to tensei-frontend.
The subfolder conf contains several configuration files.
Database setup
A database user and database have to be created for the frontend!
The script below creates a database user and a database for the frontend.
CREATE ROLE ${FRONTEND_DB_USER} WITH CREATEDB LOGIN ENCRYPTED PASSWORD '${FRONTEND_DB_PASS}';
CREATE DATABASE tenseifrontend WITH OWNER ${FRONTEND_DB_USER};
Configuration
Within the subfolder conf a file named production.conf has to be
created. It has to look like this:
include "application.conf"

play.crypto.secret=${APP_SECRET} (1)

slick.dbs.default.db.user=${FRONTEND_DB_USER} (2)
slick.dbs.default.db.password=${FRONTEND_DB_PASS} (3)| 1 | This should be a long random generated value for example via pwgen
-cns 128. |
| 2 | The name of the database user has to be added here. |
| 3 | The password of the database user has to be added here. |
Start script and parameter
The start scripts are located within the subfolder bin:
-
tensei-frontend -
tensei-frontend.bat
According to your operating system you have to chose the proper file
(for example tensei-frontend.bat for a Windows system). To start the
application several parameters have to be set. These are explained in
the following section.
| Name | Required? | Description | Recommendation |
|---|---|---|---|
|
Yes |
||
|
Yes |
The path to the frontend configuration. |
|
|
Yes |
Determines if pending database changes will be applied automatically. |
|
|
Yes, if not configured with the configuration file. |
The hostname on which the frontend system will run. |
|
|
Yes, if not configured with the configuration file. |
The hostname on which the server is running. |
|
|
Yes, if not configured with the configuration file. |
The port on which the server is listening. |
|
|
The minimum value of memory that should be allocated for the frontend. |
400 to 600 MB |
|
|
The minimum value of memory that should be allocated for the frontend. |
400 to 600 MB |
|
|
The maximum value of memory that should be allocated for the frontend. |
400 to 600 MB |
bin/tensei-frontend -J-server -J-Xms500m -J-Xmx500m·
  -J-Dconfig.file=conf/production.conf·
  -DapplyEvolutions.default=true·
  -Dtensei.frontend.hostname=localhost·
  -Dtensei.server.hostname=localhost·
  -Dtensei.server.port=4096
The parameters can be set permanently via in the file
conf/application.ini.
|
3.2.6. Update
Preparations
Before you can update the system you have to shutdown each component. This can usually be done with the following commands:
sudo service tensei-agent stop
sudo service tensei-frontend stop
sudo service tensei-server stop| If you have created an agent cluster then all nodes in the cluster have to be shutdown too. |
Now the files containing the new version can be copied onto the machine. Afterwards you can decompress them there.
If the configuration files (tensei.conf) have been modified
then you must backup those files to be able to reapply your
modifications after the update.
|
Server
sudo tar -xJvf tensei-server.txz -C /srv/tensei/tensei-server --strip-components 1
sudo chown -Rfh tensei-server /srv/tensei/tensei-server
Agent
sudo tar -xJvf tensei-agent.txz -C /srv/tensei/tensei-agent --strip-components 1
sudo chown -Rfh tensei-agent /srv/tensei/tensei-agent| If you have build an agent cluster then all nodes have to be updated too. |
Frontend
sudo tar -xJvf tensei-frontend.txz -C /srv/tensei/tensei-frontend --strip-components 1
sudo chown -Rfh tensei-frontend /srv/tensei/tensei-frontend
Finish
After you have reapplied your modifications to the configuration files the components can be started again.
sudo service tensei-server start
sudo service tensei-agent start
sudo service tensei-frontend start
3.3. Debian packages (Todo)
TODO
3.4. FAQ Installation
3.4.1. Installation of SSH support for Windows
If no SSH support is available on your Windows system, you can install Git as one alternative.
-
Download the
Windows Installerfrom https://git-scm.com/ -
Execute the
Installerand follow the instructions
SSH is neccessary to execute the vagrant ssh command
3.4.2. The system is not correctly loaded by vagrant
If the system does not run correctly after the first vagrant up, you should
reload the system.
% vagrant reload3.4.3. Services do not start
In rare circumstances some services (frontend, server, agent) may not be started correctly for example the tensei-server or the tensei-agent.
Sometimes it is enough to reload the VM. If not, the following steps can be executed.
To resolve this issue you should login to the virtual machine using the
vagrant ssh command. From within the VM you can restart the services:
% vagrant ssh% sudo service tensei-server restart% sudo service tensei-agent restart% sudo service tensei-frontend restartIf it generates an error message during the restart of one of the services (because the service is not running), this service can be started with one of the following commands.
% sudo service tensei-server start% sudo service tensei-agent start% sudo service tensei-frontend start3.4.4. Frontend doesn’t run and can not be restarted
If the VM was incorrectly stopped, the frontend service can be corrupted. The service can not be restarted.
If so, you have to delete the RUNNING_PID file within the frontend folder.
% vagrant ssh% rm /srv/tensei/tensei-frontend/RUNNING_PIDRestart the frontend service.
% sudo service tensei-frontend restart4. Configuration
The system has various possibilities for configuration. The user can configure different aspect of the frontend. More specific configurations can directly be done at the single components.
4.1. Frontend
The first user must be created after the installation. This user is automatically created with administrator rights. The form to create this first account will automatically be shown during the first access of the system.
Specific functions are only available for the administrator:
-
Create and administer user accounts
-
Create and administer user groups
-
Update the Tensei-Data license
4.2. Configuration files
Some settings are available via configuration files and specific parameters. The following sections describe the configuration of the single system components.
4.2.1. Agent
The identifier of an agent is randomly generated at the first start. This
identifier can be customized in the file tensei-agent-id.properties. This file
defines a key-value pair:
tensei.agent.id=NAME_OF_AGENT| The identifier of the agent should not contain any special characters or blanks. |
Any other configuration is made in the file tensei.conf.
# Configuration file for the tensei agent.

tensei {
  # Configure settings for this specific agent.
  agent {
    # The hostname with fallback to localhost.
    hostname = "localhost"
    hostname = ${?tensei.agent.hostname}
    # The port for the akka system with fallback to a default port.
    port = 2551
    port = ${?tensei.agent.port}
    # The directory that should contain the logfiles with fallback.
    logdir = logs
    logdir = ${?tensei.agent.logdir}
  }

  # Generic settings for all agent nodes.
  agents {
    # How long do we wait for the termination of our sub actors when aborting.
    abort-timeout = 10 seconds

    # How long do we wait for the termination of our sub actors when cleaning up.
    cleanup-timeout = 10 seconds

    # Enable or disable an interactive console for the agent which allows the execution of simple commands.
    console = false

    # The value here specifies a trigger on the parsing and processing of sequences.
    # Every `n` lines (the value defined here) a notification is published to signal that the process
    # is still working.
    sequence-indicator-trigger = 5000

    # Defines how often we report the agent state to the server.
    # Attention! This value doesn't mean that there aren't any reports in between.
    # In fact there are because we use push notifications.
    report-to-server-interval = 5 seconds

    # If the server node is marked `unreachable` e.g. if it happens that we leave the cluster then we
    # wait for this interval before we restart ourselfs. This value shouldn't be too low because the
    # server/network/whatever may need some time to get up again.
    restart-after-unreachable-server = 30 seconds

    metrics {
      # Timeout for asking the metrics listener for data.
      ask-timeout = 2 seconds
    }

    parser {
      # DFASDL syntax validation timeout.
      syntax-validation-timeout = 10 seconds

      # Timeout for the access validation.
      access-validation-timeout = 30 seconds

      # The timeout for checksum validation. This may have to be increased for huge files.
      checksum-validation-timeout = 300 seconds

      # Defines how long we wait for our subparser to initialize.
      subparsers-init-timeout = 30 seconds

      # Defines how many sequence rows are saved within one actor.
      # Increasing this value will lead to fewer objects thus taking
      # pressure off the garbage collector. The downside is that the
      # actor size will increase which will reduce performance.
      # Depending on the actual memory usage of one "sequence row"
      # this settings may be increased or decreased to influence
      # overall system performance.
      sequence-rows-per-actor = 1000

      # Settings for the FTP NetworkFileParser
      ftp-connection-timeout = 1m
      ftp-port-number = 21
      ftps-port-number = 990

      # Settings for the HTTP NetworkFileParser
      # Cookies enabled - otherwise ignored
      http-cookies-enabled = true
      # Default Proxy enabled - otherwise ignored
      http-proxy-enabled = true
      # Port number for authentication
      http-port-number = 80
      https-port-number = 443
      # encoding
      http-header-content-encoding = "Content-Encoding"
      http-header-content-encoding-value = "gzip"
      #timeouts
      http-connection-timeout = 1m
      http-connection-request-timeout = 1m
      http-socket-timeout = 1m

      # Settings for the SFTP NetworkFileParser
      sftp-connection-timeout = 1m
      sftp-port-number = 22
    }

    processor {
      # Timeout for simple ask operations.
      ask-timeout = 10 seconds

      # The timeout for retrieving a changed auto increment value.
      fetch-auto-increment-value-timeout = 30 seconds
      # The time that should be paused between re-fetch tries. This value should be smaller than the `fetch-auto-increment-value-timeout`!
      fetch-auto-increment-value-refetch = 500 milliseconds

      # The timeout for retrieving an data element from an actor path.
      fetch-data-timeout = 60 seconds

      # The timeout for the return of the xml data structure tree.
      fetch-data-structure-timeout = 30 seconds

      # The timeout for the preparation of a transformer.
      prepare-transformation-timeout = 5 seconds
      # The timeout for a single transformation.
      transformation-timeout = 90 seconds
    }

    analyzer {
      finish-timeout = 30 seconds
    }

    # Settings for writers.
    writers {
      # Settings for the database writer.
      database {
        # The database writer will write all data if it is notified to
        # close itself from the processor. Otherwise it will write
        # batches of data in a certain interval that is defined here.
        write-interval = 1 second
      }
    }
  }

  frontend {
    # Placeholder for frontend configuration. Don't delete!
  }

  # Server configuration.
  server {
    # The hostname of the server's machine with fallback to localhost.
    hostname = "localhost"
    hostname = ${?tensei.server.hostname}
    # The port of the akka system of the server cluster with fallback to the default port.
    port = 4096
    port = ${?tensei.server.port}
  }
}
4.2.2. Frontend
| TODO |
# Configuration file for the tensei frontend.

tensei {
  agents {
    # Placeholder for agents configuration. Don't delete!
  }

  queue {
    # The interval for the repeatedly start of the next entry of the queue
    start-interval = 10 seconds
    # Timeout for starting the next entry of the queue
    starting-timeout = 5 seconds
  }

  frontend {
    # Set a default hostname which can be overridden using a system property.
    hostname = "localhost"
    hostname = ${?tensei.frontend.hostname}
    # The interval for polling the frontend service from the websocket for agents informations updates.
    agent-information-polling-interval = 3 seconds
    # Defines how long buffered agents informations are considered valid.
    agent-information-update-interval  = 3 seconds
    # The default timeout for ask operations.
    ask-timeout = 5 seconds
    # Timeout for database operations.
    db-timeout = 10 seconds
    # Timeout for establishing a connection to the server.
    server-connect-timeout = 5 seconds
    # The timeout for the resolving of the actor selection of the chef de cuisine into an actor ref.
    # This timeout will usually be overriden by the `server-connect-timeout`.
    server-startup-timeout = 30 seconds
    # The interval for polling the system for the actual information about the queue
    queue-polling-interval = 1 seconds
    # Timeout for the statistical analysis
    statistic-timeout = 360 seconds
    # Timeout for the extraction of a schema
    extract-schema-timeout = 120 seconds
    # The maximum number of bytes to fetch from an agent run log at once.
    # Bigger numbers will speed things up but may lead to data loss and inconsistencies.
    # 8 KB (8192 bytes) provides a sensible default.
    log-fetcher-max-bytes = 8192

    cronjobs {
      # The initial delay after starting the system before we initialise existing cronjobs.
      init-delay = 500 milliseconds
    }

    triggers {
      # The initial delay after starting the system before we initialise existing triggers.
      init-delay = 500 milliseconds
    }

    ui {
      # The number of log lines per page.
      logs-per-page = 20

      # Number of lines of last entries in the statistics list of executed transformation configurations
      queue-hist-per-page = 20

      statistics {
        # Timeout for generating statistics of the transformation history queue.
        history-timeout = 5 minutes
      }
    }

    akka {
      loggers                          = ["akka.event.slf4j.Slf4jLogger"]
      loglevel                         = info
      log-dead-letters                 = 5
      log-dead-letters-during-shutdown = on

      actor {
        provider = "akka.cluster.ClusterActorRefProvider"

        debug {
          lifecycle = off
          unhandled = on
        }
      }

      cluster {
        seed-nodes                  = [
          "akka.tcp://tensei-system@"${tensei.server.hostname}":"${tensei.server.port}""
        ]
        roles = [frontend]
      }

      remote {
        enabled-transports          = ["akka.remote.netty.tcp"]
        log-remote-lifecycle-events = off

        transport-failure-detector {
          heartbeat-interval = 4 seconds
          acceptable-heartbeat-pause = 10 seconds
        }

        netty.tcp {
          hostname = ${tensei.frontend.hostname}
          port     = 0
        }
      }
    }
  }

  # Server configuration.
  server {
    ask-timeout = 5 seconds
    # Set a default hostname that can be overridden using a system property.
    hostname = "localhost"
    hostname = ${?tensei.server.hostname}
    # Set a default port that can be overridden using a system property.
    port = 4096
    port = ${?tensei.server.port}
  }
}
4.2.3. Server
| TODO |
# Configuration file for the tensei server.

tensei {
  agents {
    # Placeholder for generic configuration for all agents. Don't delete!
  }

  frontend {
    # Placeholder for frontend configuration. Don't delete!
  }

  # Server configuration.
  server {
    # The hostname of the server's machine with fallback to localhost.
    hostname = "localhost"
    hostname = ${?tensei.server.hostname}
    # The port of the akka system of the server cluster with fallback to the default port.
    port = 4096
    port = ${?tensei.server.port}

    # The interval for cleaning up cached agent informations.
    agent-cleanup-interval          = 30 seconds
    # The interval in which to ping agents.
    agent-ping-interval             = 10 seconds
    # The timeout for an agent ping.
    agent-ping-timeout              = 10 seconds
    # Default timeout for ask operations (blocking!).
    ask-timeout                     = 5 seconds
    # The default timeout for the booting state of the chef de cuisine.
    boot-timeout                    = 3 seconds
    # Enable or disable an interactive console to execute simple commands.
    console                         = true
    # The default timeout for the initializing state of the chef de cuisine.
    init-timeout                    = 5 seconds
    # Remove agents that are marked unreachable by the cluster and therefore disconnected after a certain amount of time.
    remove-unreachable-agents-after = 30 seconds
  }
}
5. Maintenance
5.1. Log files
The single components create log files that can be used for validation and error analysis. Furthermore, the log files are also available within the frontend.
The log files are created in the logs directory of the sinlge components.
Within the VM, the logs are available at the following paths:
|
Logs of the frontend |
|
Logs of the server |
|
Logs of the agent nodes |
6. Frontend
This part describes the functionalities and the structure of the graphical editor, that is provided for the use of the Tensei-Data system.
6.1. Overview
The Frontend allows the administration of the data integration and data management processes that can be executed via the components of the Tensei-Data system.
6.2. Structure
The different functionalities of the Frontend are reachable via the upper navigation. If functionalities are connected or dependent on each other, they are summarized under navigational elements.
6.3. Terminology
- License
-
A valid license is necessary for the use of the Tensei-Data system. A default license is provided with the system.
- Dashboard
-
The dashboard provides an overview of all currently active components that are relevant for the execution of transformation configurations (e.g. transformation configurations, Agent, Queue, Cronjob, Trigger).
- Connection Information (CI)
-
Connection information are necessary to connect the resources to the transformation configurations.
- DFASDL
-
A DFASDL describes the structure and semantic of the data.
- Cookbook
-
A cookbook describes all relevant transformations and the mappings of the data from the source to the target.
- Transformation Configuration (TC)
-
A transformation configuration contains all relevant information of a migration that are necessary for an agent.
- Agent
-
A transformation configuration is executed by an agent.
- Queue
-
All transformation configurations that can’t be executed in parallel by the available agents, are stored in the queue and executed sequentially.
- Cronjob
-
A periodical action that executes a transformation configuration.
- Trigger
-
An event-based action that executes a transformation configuration.
6.4. Functionalities
The following functionalities are available via the Frontend:
-
Get an overview of the configured
Transformation configurationson the Dashboard -
Automatically create a
DFASDL(Data Format and Semantics Description Language) that describes the structure of the data. -
Create a
Connection Informationto the source and the target system. -
Create a
Cookbookthat contains all information about the data integration or migration processes. -
Administer the connected
Agents. -
Administer services like
CronjobsorTriggers. -
Update the license that is used within the Tensei-Data environment
6.5. Best practice to execute a transformation configuration
-
Create the administrator account by the "First access"
-
Create the DFASDLs for the source and target systems (As alternative, a connection information can be created that can be used to create the DFASDL automatically.)
-
Create a cookbook that describes the migration process
-
Define the connection information to the source and target systems
-
Create a transformation configuration for the execution of the migration
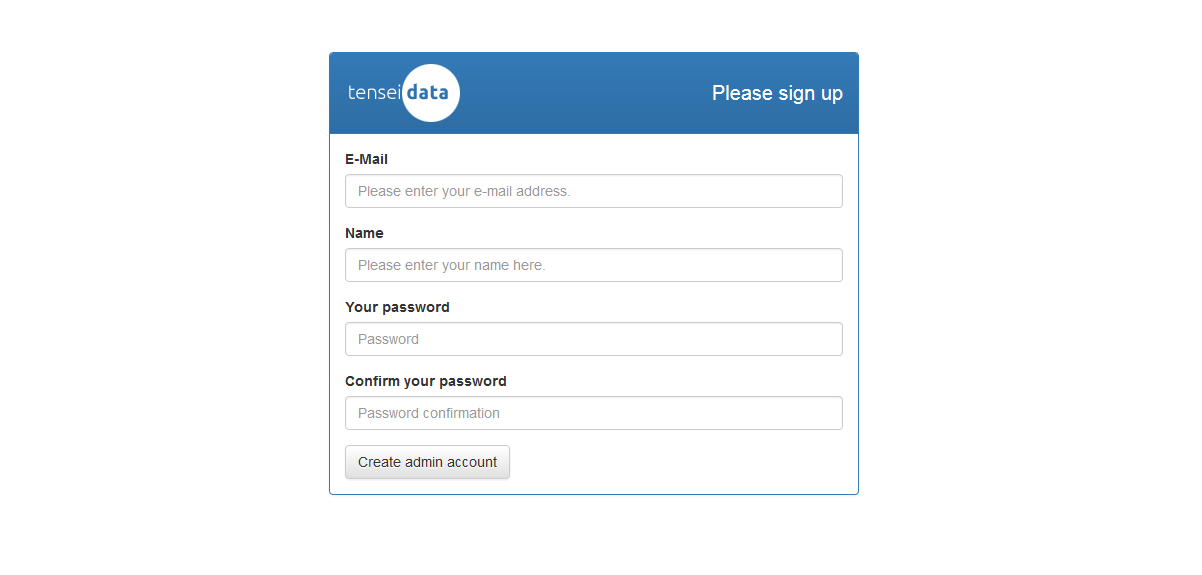
6.6. First access
The first access of the system displays a signup form which is necessary to create the administrator account. The form requires the following values:
-
an e-mail address
-
a name
-
a password with a minimum length of 12 signs
After creating the administrator account, the user is immediately logged-in.
6.7. Login
A user can log into the system with their e-mail address and password.
6.8. License
The usage of the Tensei-Data system requires a valid license. The license can be updated in the license administration via the Update button.
Select the license file in the appearing file dialog. A valid license file ends with .license.gz.
| A license is provided by default with the system. |
6.9. Dashboard
The dashboard provides a general overview about all configured and available Transformation configurations and the workload of the agents. Moreover, some additional information are provided:
6.10. DFASDL
A DFASDL describes the structure and the semantic of a data source and is used for the mapping of the data.
| The DFASDL specification can be found at Data Format and Sematics Description Language |
6.10.1. Create
For the creation of a DFASDL, the following steps must be fulfilled:
-
Click the New DFASDL button
-
Fill the relevant fields regarding to the specification
A DFASDL can automatically be created from a
Connection information. More information in part
Automatic creation of a DFASDL.
|
Form fields
DFASDL ID
The DFASDL ID allows the explicit differentiation of the available DFSADLs. The following requirements should be considered during the creation of the ID:
-
No empty spaces
-
Use the minus (-) as separator
-
A clear description of the DFASDL (Example:
my-system-version-x)
Version
The version of the DFASDL is automatically increased by the system during later updates. That allows the selection of former versions.
The DFASDL
The integrated editor supports the creation of a concrete DFASDL and supports syntax highlighting, validation and auto-complete. Additional functionalities are:
| CTRL + SPACE |
Activate the auto-complete for a DFASDL element or attribute |
| CTRL + SPACE |
Within an attribute, the auto-complete is activated |
| CTRL-Q |
Fold parts of the DFASDL |
| F11 |
Activate the fullscreen mode |
| CTRL-F |
Start a search within the DFASDL |
<?xml version="1.0" encoding="UTF-8"?>
<dfasdl xmlns="http://www.dfasdl.org/DFASDL" semantic="custom">
  <seq id="persons">
    <elem id="row">
      <str id="lastname" stop-sign=","/>
      <str id="firstname" stop-sign=","/>
      <formatstr format="(.*@.*\..*)" id="email" stop-sign=","/>
      <formattime format="dd.MM.yyyy" id="birthday" stop-sign=","/>
      <str id="phone" stop-sign=","/>
      <str id="division"/>
    </elem>
  </seq>
</dfasdl>| The specification of the DFASDL can be found at DFASDL Core. |
Access rights
The access rights restrict the visibility of the DFASDL to specific users.
-
public: All user can access the DFSADL.
-
private: Only the creator and the optionally added group can access the DFASDL
6.10.2. Filtering of source data
Sometimes it is desired to reduce the data from a sequence (e.g. the rows from
a database table). The DFASDL attribute filter makes this possible. It is
allowed only on the sequence element seq.
| Currently filtering of source data is only supported on databases! |
...
<seq id="rows" filter="salary > 20000">
  <elem id="row">
    <str id="name"/>
    <num id="salary"/>
  </elem>
</seq>
...
6.11. Reducing the visible structure of a DFASDL
If not all elements of the DFASDL are relevant, they can be excluded. Thus, these elements are no longer available in the visual mapping. It increases the clarity onto the relevant elements and simplifies the visual mapping.
<?xml version="1.0" encoding="UTF-8"?>
<dfasdl xmlns="http://www.dfasdl.org/DFASDL" semantic="custom">
  <seq id="companies">
    <elem id="companies_row">
      <str id="company_id" db-column-name="id" max-length="36" stop-sign=","/>
      <str id="name" db-column-name="name" s="companyName" stop-sign="," />
      <str id="industry" max-length="50" stop-sign=","/>
      <str id="telephoneCompany" db-column-name="telephone" s="telephoneCompany" stop-sign=","/>
      <datetime id="date_entered"/>
    </elem>
  </seq>
  <seq id="contacts">
    <elem id="contacts_row">
      <str id="contact_id" db-column-name="id" max-length="36" stop-sign=","/>
      <str id="title" stop-sign=","/>
      <str id="name2" db-column-name="name" s="contactFirstName" stop-sign=","/>
      <str id="name3" db-column-name="name2" s="contactLastName" stop-sign=","/>
      <str id="telephone" db-column-name="telephone" s="telephoneUS" stop-sign=","/>
    </elem>
  </seq>
  <seq id="employees">
    <elem id="employees_row">
      <str id="employee_id" db-column-name="id" max-length="36" stop-sign=","/>
      <str id="position" stop-sign=","/>
      <str id="name4" db-column-name="name" s="employeeFirstName" stop-sign=","/>
      <str id="name5" db-column-name="name2" s="employeeLastName" stop-sign=","/>
      <str id="telephone2" db-column-name="telephone" s="telephoneUS" stop-sign=","/>
    </elem>
  </seq>
</dfasdl>
Elements of a DFASDL structure can be excluded in two different ways. (1) Delete the elements in the DFASDL. (2) Make a comment around the elements in the DFASDL.
contacts from the DFASDL<?xml version="1.0" encoding="UTF-8"?>
<dfasdl xmlns="http://www.dfasdl.org/DFASDL" semantic="custom">
<seq id="companies">
<elem id="companies_row">
<str id="company_id" db-column-name="id" max-length="36" stop-sign=","/>
<str id="name" db-column-name="name" s="companyName" stop-sign="," />
<str id="industry" max-length="50" stop-sign=","/>
<str id="telephoneCompany" db-column-name="telephone" s="telephoneCompany" stop-sign=","/>
<datetime id="date_entered"/>
</elem>
</seq>
<seq id="employees">
<elem id="employees_row">
<str id="employee_id" db-column-name="id" max-length="36" stop-sign=","/>
<str id="position" stop-sign=","/>
<str id="name4" db-column-name="name" s="employeeFirstName" stop-sign=","/>
<str id="name5" db-column-name="name2" s="employeeLastName" stop-sign=","/>
<str id="telephone2" db-column-name="telephone" s="telephoneUS" stop-sign=","/>
</elem>
</seq>
</dfasdl>contacts in the DFASDL<?xml version="1.0" encoding="UTF-8"?>
<dfasdl xmlns="http://www.dfasdl.org/DFASDL" semantic="custom">
<seq id="companies">
<elem id="companies_row">
<str id="company_id" db-column-name="id" max-length="36" stop-sign=","/>
<str id="name" db-column-name="name" s="companyName" stop-sign="," />
<str id="industry" max-length="50" stop-sign=","/>
<str id="telephoneCompany" db-column-name="telephone" s="telephoneCompany" stop-sign=","/>
<datetime id="date_entered"/>
</elem>
</seq>
<!--
<seq id="contacts">
<elem id="contacts_row">
<str id="contact_id" db-column-name="id" max-length="36" stop-sign=","/>
<str id="title" stop-sign=","/>
<str id="name2" db-column-name="name" s="contactFirstName" stop-sign=","/>
<str id="name3" db-column-name="name2" s="contactLastName" stop-sign=","/>
<str id="telephone" db-column-name="telephone" s="telephoneUS" stop-sign=","/>
</elem>
</seq>
-->
<seq id="employees">
<elem id="employees_row">
<str id="employee_id" db-column-name="id" max-length="36" stop-sign=","/>
<str id="position" stop-sign=","/>
<str id="name4" db-column-name="name" s="employeeFirstName" stop-sign=","/>
<str id="name5" db-column-name="name2" s="employeeLastName" stop-sign=","/>
<str id="telephone2" db-column-name="telephone" s="telephoneUS" stop-sign=","/>
</elem>
</seq>
</dfasdl>6.11.1. Compare DFASDL versions
It is possible to compare the actual DFASDL version with former versions (diff). Do the following:
-
Click the name of the DFASDL on the overview page of all DFASDLs
-
In the field version, the actual version of the DFASDL is displayed
-
If former versions are available, a button to select a former version for the comparison is displayed
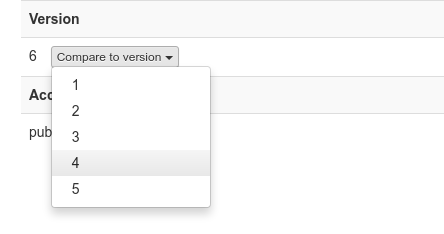
On the comparison page is another button that allows the selection of other versions for the comparison.
6.12. Cookbook
A cookbook allows the creation of mappings and transformations between the source and the target DFASDLs.
6.12.1. Create
The creation of the cookbook requires the following steps:
-
Click the New cookbook button
-
Insert a unique ID for the cookbook
The following tabs are used to change specific settings:
- Resources-Tab
-
Select the source and target DFASDLs
- Settings-Tab
-
Select the version of the source and target DFASDLs
- Mappings-Tab
-
Create recipes and mappings
6.12.2. Mappings-Tab
The Mappings-Tab provides the following information:
-
Recipes
-
Graphical visualisation of the source and target DFASDLs
6.12.3. Create a recipe
A recipe contains all mappings for a logically connected data structure (e.g.
for a sequence (seq) or all data elements within a structural element (e.g.
elem)).
Logically connected data elements (e.g. str, num, …) must be
processed within one recipe. Logically connected are all elements that are
under the same sequence (seq) or within a superordinated structural element (e.g.
elem). The number of used mappings is not relevant. More information about this
basic principle in Principles for the mappings.
|
All data elements of a logically connected structure must be
connected within the target DFASDL. If specific elements of the target are
irrelevant, they must be connected with at least a Nullify
transformer. Additional information in Principles for the
mappings.
|
-
Click the + button to create a new recipe
-
Set a name for the recipe (optional)
-
Select the modus of the recipe
-
MapAllToAll: All source elements are completely mapped to each target element.
-
MapOneToOne: Each single source element is mapped one-to-one to its corresponding target element.
-
The mappings between the source and target data are created within a recipe. A new mapping can be created as follows:
-
Create a new mapping by clicking the Mappings(+) button
-
Select the source and target elements by clicking into the graphical visualisation (Select a source and a target element)
-
The order of the elements can be changed via Drag&Drop
-
-
Create a transformation (T)
-
A transformation transforms data from the source to the target
-
Create a new transformation by clciking the Transformations(+) button
-
Select the desired transformer
-
Fill the specific fields of the selected transformer
-
This step is optional
-
-
Create an atomic transformation (A)
-
An atomic transformation transforms the data in the source
-
Create an atomic transformation by clicking the Atomic Transformations(+) button
-
Select the source element that is transformed by the atomic transformation
-
Select the desired atomic transformer
-
Fill the specific fields of the selected transformer
-
This step is optional
-
-
Select a mapping key
-
Fields in multiple source files can be merged with an ID that has the same name.
-
Fields in a database can be merged by using this key. This is a simple alternative for an own select via
db-selectattribute. -
This step is optional
-
| If you want to map elements into a target sequence, all the elements of the target sequence must be specified in one recipe. This is necessary because a sequence always describes an entire row and all elements of the row must be available during processing. Within the recipe the elements can be split into multiple mappings. |
Recipe mode : MapOneToOne and MapAllToAll
A recipe can be of mode MapOneToOne or MapAllToAll. The difference between these two modes is mainly the kind of mapping of elements from the source to the target.
MapOneToOne
Each single source element is mapped one-to-one to its corresponding target element.
Source elements:
-
element1
-
element2
Target elements:
-
elementY
-
elementZ
Mapping:
-
element1 → elementY
-
element2 → elementZ
MapAllToAll
All source elements are completely mapped to each target element.
Source elements:
-
element1
-
element2
Target elements:
-
elementY
-
elementZ
Mapping:
-
element1, element2 → elementY
-
element1, element2 → elementZ
6.12.4. Transformers
Transformers are used to transform the data during the migration. A distinction is made between genereal and atomic transformers.
Difference between General and Atomic transformers
The General Transformers and the Atomic Transformers differ in two essential aspects:
-
Execution time
-
Transformed elements
Execution time
The two types of transformers are executed at different execution times.
The General Transformers are executed after the Atomic Transformers.
The Atomic Transformers are executed before the General Transformers.
Recipe → Mapping → Atomic Transformers → General Transformers
Transformed Elements
The two types of transformers differ in the number of elements that are transformed during the execution of a mapping.
The General Transformers are used on all elements that are specified in the mapping. Within a MapOneToOne recipe, the transformer is consecutively executed to each element of the source. Within a MapAllToAll recipe, the transformer is simultaneously executed to all elements from the source.
The Atomic Transformers are independent of the mode of the recipe executed on one specified element from the source within the mapping.
6.12.5. General Transformers
General transformers are used to transform the data during the migration from the source to the target. General transformers are executed after the atomic transformers.
Concat
The Concat transformer connects the incoming data and returns a character string.
- separator
-
A character string that is placed between the data during the connection.
- prefix
-
A character string that is added to the beginning.
- suffix
-
A character string that is added to the end.
-
Connect two elements with a space character
- Options
-
-
separator: " " (space character)
-
- Elements
-
-
foo, bar
-
- Result
-
-
"foo bar"
-
-
Connect three elements with a hyphen
- Options
-
-
separator: -
-
- Elements
-
-
foo, bar, baz
-
- Result
-
-
"foo-bar-baz"
-
-
Connect two elements with an underscore and add a prefix
- Options
-
-
separator: _
-
prefix: Super
-
- Elements
-
-
foo, bar
-
- Result
-
-
"Super foo_bar"
-
DateConverter
The DateConverter converts a DateTime into a Timestamp or a Timestamp
into a DateTime.
- format
-
The format of the
DateTimevalue. Default:yyyy-MM-dd HH:mm:ss. Possible formats depend on the java.time.format.DateTimeFormatter class. - timezone
-
Timezone of the
DateTimevalue as numerical specification (e.g.+0200). Default:Z
A format can be specified via the definitions from
java.time.format.DateTimeFormatter.
|
-
Convert a
Timestampinto aDateTimewith timezone of +02- Options
-
-
timezone: +200
-
- Element
-
-
42 (Timestamp that defines 42 milli seconds from 1970-01-01)
-
- Result
-
-
1970-01-01 02:00:00.042
-
DateTypeConverter
The DateTypeConverter converts a given date, time or timestamp into the specified target type.
- target
-
The specified target type. Available values are
date(to1970-01-01),time(to12:13:55) ordateime(to2001-07-04 14:25:22).
-
Convert a
Datevalue into aTimestamp- Options
-
-
target: datetime
-
- Element
-
-
2012-01-01
-
- Result
-
-
2012-01-01 00:00:00.0
-
-
Convert a
Timestampinto aTimevalue.- Options
-
-
target: time
-
- Element
-
-
2001-11-22 14:22:33.0
-
- Result
-
-
14:22:33
-
-
Convert a
Timevalue into aDate.- Options
-
-
target: date
-
- Element
-
-
12:55:11
-
- Result
-
-
1970-01-01
-
-
Convert a
Timestampinto aDate.- Options
-
-
target: date
-
- Element
-
-
1986-12-12 18:25:22.0
-
- Result
-
-
1986-12-12
-
DateValueToString
The DateValueToString transformer converts a given Date, Time or
Datetime value to a String. The format parameter can be used to
define a different target format of the value. If the format parameter
is empty, the value is simply converted into a String.
- format
-
A target format that is used to transform the given
Date,TimeorDatetimevalue. If this parameter is empty, the value is simply converted into String. Possible formats depend on the java.time.format.DateTimeFormatter class.
-
Convert a
Datevalue into another format- Options
-
-
format: dd.MM.yyyy
-
- Element
-
-
2016-04-27
-
- Result
-
-
27.04.2016
-
-
Convert a
Timevalue into another format- Options
-
-
format: HH:mm
-
- Element
-
-
13:22:22
-
- Result
-
-
13:22
-
-
Convert a
DateTimevalue into another format- Options
-
-
format: dd.MM.yyyy h:mm a
-
- Element
-
-
2016-04-27 13:22:22
-
- Result
-
-
27.04.2016 1:22 PM
-
EmptyString
The EmptyString transformer writes an empty character string into the target element.
| The target data type must be able to accept a character string. |
ExtractBiggestValue
The ExtractBiggestValue transformer determines the biggest / longest value from the given data.
If the incoming data are character string, the longest character string will be returned. If the incoming data are numerical values, the biggest value will be returned. If the incoming data are mixed with character strings and numerical values, the longest value will be returned.
IDTransformer
The IDTransformer creates a new ID for a target field. Depending on the
specification, a Long or an UUID will be created. If the data sets are
successive, the transformer creates incremented values.
- field
-
The name of the target field in the mapping.
- start
-
An optional start value for a
LongID: Default:0 - type
-
The created ID can be a Long (
long) or an UUID (uuid). Default:long
-
Get an integer ID starting on 41 for a specific field
- Options
-
-
field: field1 (Element of the DFASDL)
-
start: 41
-
type: long
-
- Element
-
-
-
-
- Result
-
-
For the first call of the transformer: 41
-
For the next call: 42, and so on …
-
IfThenElseNumeric
The IfThenElseNumeric transformer allows simple if-then-else expressions for
numerical values.
- if
-
A function that determines whether the
thenor theelsebranch will be executed. The function supports the following operators:==, !=, <, ⇐, >=, >. - then
-
A function that describes a transformation of the data. Supported operators are:
+, -, *, / - else
-
A function that describes a transformation of the data. Supported operators are:
+, -, *, / - format
-
Defines the
typeof the returned values as long (num) or BigDecimal (dec). Default:dec
An if condition could be as follows: x>42 or 3.141 != x
|
A then or else function must be specified for assignments as follows:
x=x+1 oder x=3-x. If a constant is required, the function will be specified
without operator: 42
|
-
Values that are bigger than 6 should be changed to 0
- Options
-
-
if: x>6
-
then: 0
-
- Elements
-
-
1,2,3,4,5,6,7,8
-
- Result
-
-
1,2,3,4,5,6,0,0
-
-
Values that are bigger than 3 must be added with 2
- Options
-
-
if: x>3
-
then: x=x+2
-
- Elements
-
-
1,2,3,4,5
-
- Result
-
-
1,2,3,6,7
-
-
Values smaller than 3 must be multiplied with 3, otherwise substracted from 2
- Options
-
-
if: x⇐2
-
then: x=x*3
-
else: x=2-x
-
- Elements
-
-
1,2,3,4,5
-
- Result
-
-
3,6,-1,-2,-3
-
-
Values that are bigger than 2 must be added with 1, otherwise substracted with 1 and returned as integer
- Options
-
-
if: x>2
-
then: x=x+1
-
else: x=x-1
-
format: num
-
- Elements
-
-
1.5,2,3,4,5
-
- Result
-
-
1,1,4,5,6
-
LowerOrUpper
This transformer returns a lower or upper version of the provided string.
- locale
-
The Locale defines how operations like lowercase and uppercase are executed. If this parameter is left empty then the locale of the system will be used on which the agent is running.
- perform
-
Perform one of the following transformations.
lower- All characters as lower characters.upper- All characters as upper characters.firstlower-
Only the first character as lower character, the others are unchanged.
firstupper- Only the first character as upper character, the others are unchanged.
-
-
Write all characters as lower characters
- Options
-
-
perform: lower
-
- Element
-
-
Foo BAR Result:
-
foo bar
-
-
Write only the first character as lower character
- Options
-
-
perform: lower
-
- Element
-
-
FOO Bar Result:
-
fOO Bar
-
MergeAndExtractByRegEx
The MergeAndExtractByRegEx transformer connects the incoming data and executes a reular expression. The result of the regular expression will be returned.
- regexp
-
The regular expression that is executed on the character string.
- filler
-
A character string that is placed between the resulting groups (default: "")
- groups
-
A list of groups that should be returned. (comma separated, beginning with 0. Default: All groups are returned.)
-
Extract a specific word out of a sentence
- Options
-
-
regexp: .*(home).*
-
- Element
-
-
This is a [home] with :three: windows!
-
- Result
-
-
home
-
-
Extract all matched groups from a sentence
- Options
-
-
regexp: .*(home).*(windows).*
-
- Element
-
-
This is a [home] with :three: windows!
-
- Result
-
-
homewindows
-
-
Extract all matched groups from a sentence and connect them with a specific character
- Options
-
-
regexp: .*(home).*(windows).*
-
filler: -
-
- Element
-
-
This is a [home] with :three: windows!
-
- Result
-
-
home-windows
-
-
Return specific groups
- Options
-
-
regexp: .*(This).*(home).*(window).*
-
filler: #
-
groups: 0,2
-
- Element
-
-
This is a [home] with :three: windows!
-
- Result
-
-
This#window
-
-
Remove space characters before and after a word group
- Options
-
-
regexp: \s*?(\w+\s?\w+)\s*?
-
\s*? - An undefined number of space characters before and after the word group
-
\w - word character [A-Za-z0-9_]
-
\s? - a space character can between the word characters
-
-
groups: 1
-
- Element
-
-
" Max Mustermann "
-
- Result
-
-
"Max Mustermann"
-
Nullify
The Nullify transformer returns no data. This transformer allows the mapping of fields in the target that must be considered but contain no data.
A common use case is a MapAllToAll where one source element is mapped to numerous elements in the target. These elements are considered in the structure but not filled with any data.
| The target data type must be able to accept a "Null" value. You should not send the result of this transformer into a field of a database that is specified as "Not Null". |
| If a mapped field has a default attribute, the value will be filled into the target. |
Overwrite
The Overwrite transformer writes the given value into the target element and
converts the value into the specified type.
- value
-
The value that should be written into the target element.
- type
-
The expected data type of the
value. Possible types are:byte(as Array[Byte]),string(e.g. "foo"),long(z.B. 0),bigdecimal(e.g. 0 or 2.3),date(e.g. 1970-01-01),time(e.g. 00:00:00),datetime(e.g. 1970-01-01 00:00:00),none(as undefined value)
If you have a num element, you must choose the type: long. If you
overwrite a comma separated number or formatnum, you should select type:
bigdecimal.
|
The actual time, date or timestamp can automatically be
written by setting value to now (See example below).
|
-
Write a word into the target field
- Options
-
-
value: foo
-
type: string
-
- Element
-
-
bar
-
- Result
-
-
foo
-
-
Replace a string with a defined number
- Options
-
-
value: 1
-
type: long
-
- Element
-
-
foo
-
- Result
-
-
1
-
-
Write a date into the target field
- Options
-
-
value: 2015-12-31
-
type: date
-
- Element
-
-
foo
-
- Result
-
-
2015-12-31
-
-
Write the actual date / time / datetime value
- Options
-
-
value: now
-
type: date (or time, datetime)
-
- Element
-
-
0000-00-00
-
- Result
-
-
2016-04-15
-
Replace
The Replace transformer replaces all occurences of a given search string by a given one. The search string can be a regular expression.
- search
-
Die string to be replaced which can be a regular expression. If multiple strings shall be replaced they can be given as a comma separated list inside single quotes for example:
'ReplaceMe','\\sReplaceMeToo',' I wanna be replaced\?' - replace
-
The string that shall be used as a replacement. If left empty the found search strings will be deleted.
- count
-
The number of found strings that shall be replaced. If no value is given then all occurences will be replaced.
Within the search string special characters have to be
escaped by using a backslash (\). Examples for special characters are:
. $ ^ { [ ( | ) * + ? \ This means that control characters for regular
expression have to be adjusted accordingly (for example \\w instead of
\w).
|
-
Replace a word by another word
- Options
-
-
search: original
-
replace: actual
-
- Element
-
-
This is the original source string!
-
- Result
-
-
This is the actual source string!
-
-
Replace multiple words
- Options
-
-
search: 'original','actual'
-
replace: bar
-
- Element
-
-
This is the original actual source string"
-
- Result
-
-
This is the bar bar source string!
-
-
Replace a word and the space characters
- Options
-
-
search: ' original '
-
replace: bar
-
- Element
-
-
This is the original actual source string!
-
- Result
-
-
This is thebaractual source string!
-
-
Replace a word just once
- Options
-
-
search: original
-
replace: bar
-
count: 1
-
- Element
-
-
This is the original original original source string!
-
- Result
-
-
This is the bar original original source string!
-
-
Replace a matched regex
- Options
-
-
serarch: '\\w+'
-
replace: 22
-
- Element
-
-
test test
-
- Result
-
-
22 22
-
Split
The Split transformer separates the incoming data by using a defined pattern.
- pattern
-
This pattern is used to separate the character string.
- limit
-
Return the first x separated elements. (Default: -1 for all)
- selected
-
Return the separated elements at the given position (Comma separated list of integer values beginning with 0)
-
Split a character string at the comma
- Options
-
-
pattern: ,
-
- Element
-
-
alex,mustermann,2015-12-31
-
- Result
-
-
"alex","mustermann","2015-12-31"
-
-
Return only the first two splits
- Options
-
-
pattern: ,
-
limit: 2
-
- Element
-
-
alex,mustermann,2015-12-31
-
- Result
-
-
"alex","mustermann"
-
-
Return specific hits of the split
- Options
-
-
pattern: ,
-
selected: 0,2
-
- Element
-
-
alex,mustermann,2015-12-31
-
- Result
-
-
"alex","2015-12-31"
-
TimestampCalibrate
The TimestampCalibrate transformer adapts the value of a list of timestamps.
- perform
-
Add or reduce a value to the timestamp. With
add, the timestamp will be multiplied by 1000, withreducethe timestamp will be divided by 1000.
-
Add the milliseconds to a timestamp
- Options
-
-
perform: add
-
- Element
-
-
1441196805
-
- Result
-
-
1441196805000
-
6.12.6. Atomic Transformers
Atomic transformers are used on the source data and will be executed before the general transformers.
BoxDataIntoList
The BoxDataIntoList transformer creates a simple list from the incoming data.
Replace
Same as at Replace.
TimestampAdjuster
The TimestampAdjuster transformer adapts the value of a list of timestamps.
- perform
-
Add or reduce a value to the timestamp. With
add, the timestamp will be multiplied by 1000, withreducethe timestamp will be divided by 1000.
6.12.7. Execute transformers consecutively
It is possible to execute transformers consecutively within a mapping to perform complex transformations.
The following example transforms a Timestamp, that is not in
milliseconds, into a java.sql.Date which can be stored into a database
field of type Date.
The following three transformers are used:
-
-
Parameter
performwith valueadd
-
-
-
Parameter
targetwith valuedate
-
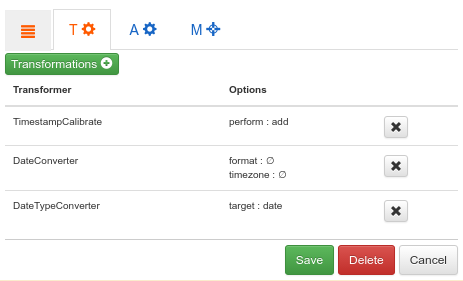
The transformers perform the following transformations with the data:
-
TimestampCalibrate multiplies the Timestamp with 1000 to create a Timestamp in milliseconds.
-
The DateConverter transforms the Unix Timestamp into an ISO
LocalDateTime. -
Finally, the DateTypeConverter transforms the value into a
java.sql.Datewhich can be stored into a database field of typeDate.
An example could be as follows:
-
Transformation with TimestampCalibrate
-
1461712920 → 1461712920000
-
-
Transformation with DateConverter
-
1461712920000 → 2016-04-26T23:22
-
-
Transformation with DateTypeConverter
-
2016-04-26T23:22 → 2016-04-26
-
6.12.8. Principles for the mappings
A recipe contains logically connected data elements
Connected data elements must always be processed within one recipe. Data elements are logically connected when they have the following characteristics:
-
They are within a sequence (
seq) -
They are within a superordinated structural element (e.g.
elem) -
They must be migrated in a logically connected target structure (e.g. a sequence or a structural element that contains the relevant data elements)
The example contains two recipes that fulfill the following principles:
-
Recipe 1 (Rezept 1)connectsvorname,nachname,geburtsssdaetumandtelefonfrom the source element (elemwith idcsv_header) into the target element (elemwith idheader) and its data elements (vorname,nachname,datumandtelefon). The data elements are all within the superordinated target element and describe a logically connected structure. -
Recipe 2 (Rezept 2)connects all data elements from the source sequence with the data elements of the target sequence. The data elements are within a sequence and describe a logically connected structure.
Elements of a connected target structure must be processed within one recipe
All data elements of a logically connected data structure of the target DFASDL must be
connected within at least one mapping. If elements are irrelevant, they must be
connected with at least a Nullify transformer.
Tensei-Data migrates the data depending on the structure that is
defined by the user. If an element of the target strucutre is irrelevant, the
element can be deleted from the target DFASDL or must be connected with a
Nullify transformer.
|
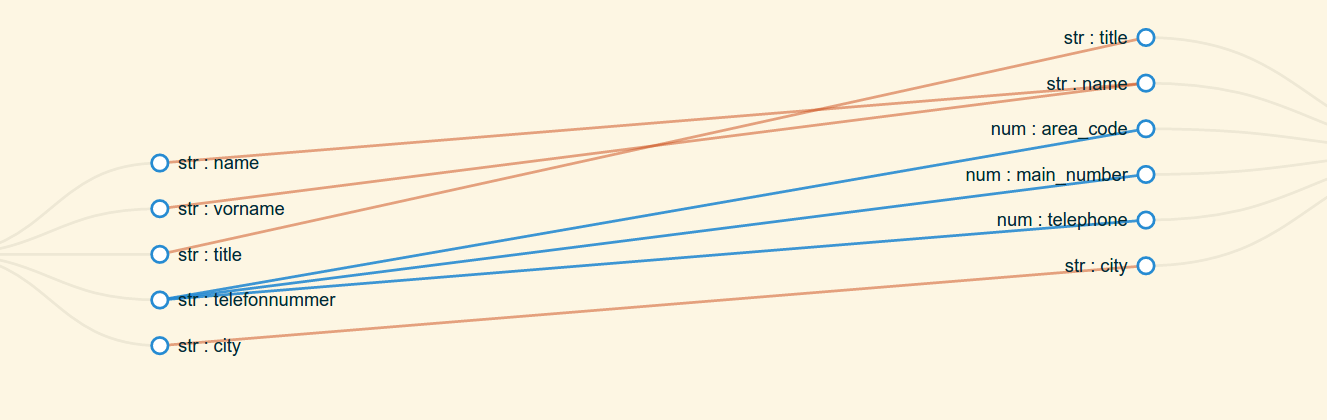
The example connects all elements of the target with elements from the source.
The following mappings are created within one recipe (Mode is
MapAllToAll):
-
The fields
nameandvornamefrom the source are migrated with theconcat transformerinto the fieldnameof the target. (Mapping 1) -
The field
titleis simply connected with thetitlefield of the target. (Mapping 2) -
The field
cityis simply connected with the fieldcityof the target. (Mapping 3) -
The field
telefonnummeris used as neutral element to apply theNullify transformerto the three fieldsarea_code,main_numberandtelephone. This transformer simply creates an empty mapping to the target structure. (Mapping 4)
6.13. Connection Information (CI)
The connection information defines all necessary parameters to access the data in the source or the target.
6.14. Create
If a connection information is created, the following steps must be fulfilled:
-
Click the New connection information button
-
Insert a valid URI
-
Fill the required fields
6.14.1. Form fields
URI
The URI describes a valid connection to the data source. A valid URI is:
-
Databases
-
Derby: jdbc:derby://path-to/derby-file -
H2: jdbc:h2://Pfad/zur/h2-file -
HyperSQL: jdbc:hsqldb:hsql://10.8.1.10/my-db -
Firebird: jdbc:firebirdsql://10.8.1.10:12345//path/to/db/my-db.fdb -
MariaDB: jdbc:mariadb://192.168.0.42/my-db -
Microsoft SQL Server: jdbc:sqlserver://10.8.1.129:1433;databaseName=my-db;applicationName=myApplication -
MySQL: jdbc:mysql://hostname/datenbank -
Oracle: jdbc:oracle:thin:@10.0.2.2:1521:my-db -
Postgresql: jdbc:postgresql://hostname:port/datenbank -
SQLite: jdbc:sqlite:///path-to/sqlite-file
-
-
File
-
Network File
-
ftps://hostname/your-file.csv
-
sftp://hostname/another-folder/your-file.csv
Locale
Currently only for Excel. The "Locale" defines the format of numeric and date values.
Username (optional)
The username to access the data source.
Password (optional)
The password to access the data source.
Checksum (optional)
A checksum to verify the data source.
Access rights
The access rights restrict the visibility of the connection information to specific users.
-
public: All user can access the connection information.
-
private: Only the creator and the optionally added group can access the connection information. TODO
6.14.2. Automatic creation of a DFASDL
The button New DFASDL in the list of Connection informations allows the automatic creation of a DFASDL for the Connection information.
| Currently available for database connections and files in CSV or JSON format. |
6.15. Transformation Configuration (TC)
A transformation configuration connects the Connection information and the Cookbook for the execution by an agent.
6.16. Create
During the creation of a Transformation configuration, the following requirements must be fulfilled:
-
Click the New transformation configuration button
-
Define a clear name
-
Select the Cookbook
-
Select the Connection information for the sources
-
Select the Connection information for the target
-
Select access rights
Access rights
The access rights restrict the visibility of the transformation configuration to specific users.
-
public: All user can access the transformation configuration.
-
private: Only the creator and the optionally added group can access the transformation configuration. TODO
6.17. Agent
Tensei-Data is an agent based system. An agent executes a Transformation configuration.
Agents can have the following connection status:
-
Connected
-
Disconnected
-
Unauthorized
6.17.1. Connected agents
Connected agents can be used to execute Transformation configurations and are correctly connected to the system.
6.17.2. Disconnected agents
Disconnected agents are not correctly connected to the system.
6.17.3. Unauthorized agents
Unauthorized agents are not authorized to connect to the system.
6.17.4. Queue
Depending on the number of available agents, x Transformation configurations can be executed in parallel by x agents. The additional Transformation configurations are stored in the queue.
The stored Transformation configurations are executed by the next free agents.
6.18. Services
Two services are available for the automatic execution of transformation configurations.
6.18.1. Cronjob
Cronjobs are timed actions which perform a Transformation configuration.
Create
For the creation of a cronjob, the following steps must be fulfilled:
-
Click the New Cronjob button
-
Select the Transformation configuration
-
Specify a valid timestamp that defines the interval for the execution of the Transformation configuration
-
Additional information below the field in the frontend
-
-
Activate or deactivate the cron
-
Specifiy access rights
6.18.2. Trigger
A trigger allows an event-based execution of a Transformation configuration.
Create
For the creation of a trigger, the following steps must be fulfilled:
-
Click the New Trigger button
-
Select a Transformation configuration
-
Specify the type of the trigger
-
Here you must specify if the trigger will be executed via an Apache Camel endpoint uri or via the successful completion of another Transformation configuration.
-
-
Now you either
-
specify a valid endpoint URI that defines a monitored event.
-
or select the Transformation configuration that should execute the trigger.
-
-
Activate or deactivate the trigger
-
Specifiy access rights
| Through the usage of triggers that execute upon the successful completion of Transformation configurations you can model complex scenarios. |
jetty:http://0.0.0.0:8192/PFADThe port (8192) is locally defined in the Vagrantfile of the VM.
Activate the trigger on the local machine.
http://localhost:8192/PFAD6.19. Administrator
The administrator can specifiy additional settings.
6.19.1. User management
User can be created, administered and deleted.
6.19.2. Groups
Groups can be created, administered and deleted. Additioanlly, users can be assigned to specific groups.
6.20. Profile
Every user can change the following settings within his profile:
-
Change the e-mail
-
Change the name
-
Set a new password
6.21. Use Case
The following use cases show some concrete representations of the single components.
6.21.1. Read data from a CSV file and write to database
Read the content of a CSV file and store into a database. The telefonnummer
will be transformed and stored into different target columns. name and
vorname will be combined and stored into the name column of the database.
<?xml version="1.0" encoding="UTF-8"?>
<dfasdl xmlns="http://www.dfasdl.org/DFASDL" semantic="custom">
  <seq id="mitarbeiter">
    <elem id="column">
      <str id="name" stop-sign="," />
      <str id="vorname" stop-sign="," />
      <str id="title" stop-sign="," />
      <str id="telefonnummer" stop-sign="," />
      <str id="city" />
    </elem>
  </seq>
</dfasdl><?xml version="1.0" encoding="UTF-8"?>
<dfasdl xmlns="http://www.dfasdl.org/DFASDL" semantic="custom">
<seq id="mitarbeiter">
<elem id="column">
<str id="title" stop-sign=","/>
<str id="name" stop-sign="," />
<num id="area_code" stop-sign=","/>
<num id="main_number" stop-sign=","/>
<num id="telephone" stop-sign=","/>
<str id="city" />
</elem>
</seq>
</dfasdl>The mapping of the two DFASDLs looks as follows.
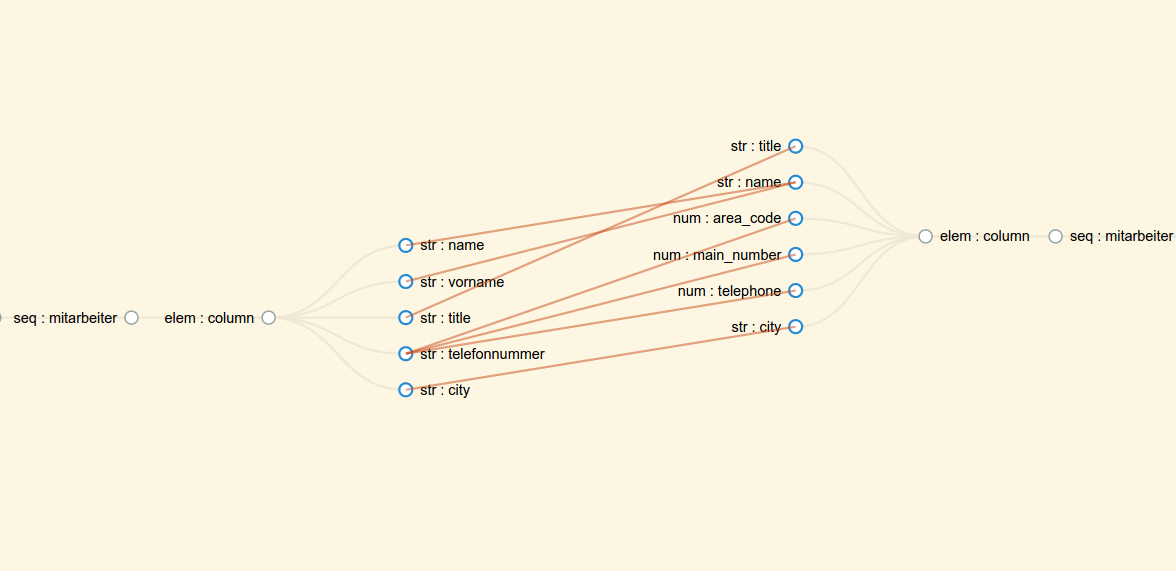
-
The mappings are created in one
MapAllToAllrecipe -
There are 6 mappings
-
name,vorname→name -
title→title -
telefonnummer→area_code -
telefonnummer→main_number -
telefonnummer→telephone -
city→city
-
-
nameandvornameare combined with the Concat transformator -
The
telefonnummerhas the this format in the CSV file:(733) 102-8755-
The area code is determined with the MergeAndExtractByRegEx transformator and stored into the
area_codecolumn. The regular expression is :\((\d+)\).* -
The main number is extracted by using the Split transformator two times
-
The first split has a
spaceaspatternand a1in theselectfield -
The second split separates the main number at the
-sign, which is also used in thepatternfield. The returned character string contains only numbers
-
-
Only numbers can be stored into the
telephonecolumn. First the MergeAndExtractByRegEx is used, secondly, the Split transformator-
The regular expression for the MergeAndExtractByRegEx transformator is
([\d[^-\(\)]]*) -
The
patternfor the Split is a space character
-
-
Finally, the following steps must be done:
-
Create a Connection Information (CI) for the CSV file
-
Create a Connection Information (CI) for the target databse
-
Create a Transformation Configuration (TC) for the execution
-
Execute the Transformation Configuration (TC) at the dashboard
7. Agent
7.1. Cluster agents
An agent can be started on several computers (clustering). The following instruction must be observed.
In the current cluster model, the main node provides the essential work (parsing, processing) and uses the other nodes to distribute the amount of data. In the future, other nodes should also be used to parallelize the work.
All nodes within the cluster must define the same ID for the agent
(tensei.agent.id)!
|
The agent directory must be copied to all relevant computers. Afterwards, one computer must be defined as seed-node.
| The seed-node must always be started as first! |
The following system properties can be used for the configuration of the cluster on the single nodes:
Variable |
Description |
Default |
|
The hostname or the IP-address of the node. |
|
|
The port number of the node. |
|
|
The hostname or the IP-address of the server. |
|
|
The address of the main seed-node. |
|
The address of the seed-node must be a valid Akka-Cluster-address:
akka.tcp://tensei-agent@HOSTNAME:PORT!
|
The parameters can be set via -D… when executing the start script or
adapted in the file tensei.conf.
7.1.1. FAQ
- How to add a new node?
-
A node is simply installed and started on a computer. A few seconds later, it should be available in the frontend.
- How to remove a node?
-
The node is stopped and no longer available for the cluster.
- Can I add a node, if the system is running?
-
When a transformation configuration is executing, the nodes should not be changed!
- What happens, when the seed-node is restarted?
-
If the seed-node is restarted, all other nodes of the cluster must also be restarted.
8. Cookbook
This cookbook ection describes the approaches that are recommendable during the creation of DFASDLs.
8.1. DFASDL
A DFASDL includes structure and semantics and is the basis for the description of a data source.
The specification can be found at DFASDL Core.
8.1.1. Minimum structure
The minimum structure of a DFASDL without concrete description of structure and semantic is based on the following:
<?xml version="1.0" encoding="UTF-8"?>
<dfasdl xmlns="http://www.dfasdl.org/DFASDL" semantic="custom">

...

</dfasdl>
8.1.2. Reducing the visible structure
If not all elements of the DFASDL are relevant, they can be excluded. Thus, these elements are no longer available in the visual mapping. It increases the clarity onto the relevant elements and simplifies the visual mapping.
<?xml version="1.0" encoding="UTF-8"?>
<dfasdl xmlns="http://www.dfasdl.org/DFASDL" semantic="custom">
  <seq id="companies">
    <elem id="companies_row">
      <str id="company_id" db-column-name="id" max-length="36" stop-sign=","/>
      <str id="name" db-column-name="name" s="companyName" stop-sign="," />
      <str id="industry" max-length="50" stop-sign=","/>
      <str id="telephoneCompany" db-column-name="telephone" s="telephoneCompany" stop-sign=","/>
      <datetime id="date_entered"/>
    </elem>
  </seq>
  <seq id="contacts">
    <elem id="contacts_row">
      <str id="contact_id" db-column-name="id" max-length="36" stop-sign=","/>
      <str id="title" stop-sign=","/>
      <str id="name2" db-column-name="name" s="contactFirstName" stop-sign=","/>
      <str id="name3" db-column-name="name2" s="contactLastName" stop-sign=","/>
      <str id="telephone" db-column-name="telephone" s="telephoneUS" stop-sign=","/>
    </elem>
  </seq>
  <seq id="employees">
    <elem id="employees_row">
      <str id="employee_id" db-column-name="id" max-length="36" stop-sign=","/>
      <str id="position" stop-sign=","/>
      <str id="name4" db-column-name="name" s="employeeFirstName" stop-sign=","/>
      <str id="name5" db-column-name="name2" s="employeeLastName" stop-sign=","/>
      <str id="telephone2" db-column-name="telephone" s="telephoneUS" stop-sign=","/>
    </elem>
  </seq>
</dfasdl>
Elements of a DFASDL structure can be excluded in two different ways. (1) Delete the elements in the DFASDL. (2) Make a comment around the elements in the DFASDL.
contacts from the DFASDL<?xml version="1.0" encoding="UTF-8"?>
<dfasdl xmlns="http://www.dfasdl.org/DFASDL" semantic="custom">
<seq id="companies">
<elem id="companies_row">
<str id="company_id" db-column-name="id" max-length="36" stop-sign=","/>
<str id="name" db-column-name="name" s="companyName" stop-sign="," />
<str id="industry" max-length="50" stop-sign=","/>
<str id="telephoneCompany" db-column-name="telephone" s="telephoneCompany" stop-sign=","/>
<datetime id="date_entered"/>
</elem>
</seq>
<seq id="employees">
<elem id="employees_row">
<str id="employee_id" db-column-name="id" max-length="36" stop-sign=","/>
<str id="position" stop-sign=","/>
<str id="name4" db-column-name="name" s="employeeFirstName" stop-sign=","/>
<str id="name5" db-column-name="name2" s="employeeLastName" stop-sign=","/>
<str id="telephone2" db-column-name="telephone" s="telephoneUS" stop-sign=","/>
</elem>
</seq>
</dfasdl>contacts in the DFASDL<?xml version="1.0" encoding="UTF-8"?>
<dfasdl xmlns="http://www.dfasdl.org/DFASDL" semantic="custom">
<seq id="companies">
<elem id="companies_row">
<str id="company_id" db-column-name="id" max-length="36" stop-sign=","/>
<str id="name" db-column-name="name" s="companyName" stop-sign="," />
<str id="industry" max-length="50" stop-sign=","/>
<str id="telephoneCompany" db-column-name="telephone" s="telephoneCompany" stop-sign=","/>
<datetime id="date_entered"/>
</elem>
</seq>
<!--
<seq id="contacts">
<elem id="contacts_row">
<str id="contact_id" db-column-name="id" max-length="36" stop-sign=","/>
<str id="title" stop-sign=","/>
<str id="name2" db-column-name="name" s="contactFirstName" stop-sign=","/>
<str id="name3" db-column-name="name2" s="contactLastName" stop-sign=","/>
<str id="telephone" db-column-name="telephone" s="telephoneUS" stop-sign=","/>
</elem>
</seq>
-->
<seq id="employees">
<elem id="employees_row">
<str id="employee_id" db-column-name="id" max-length="36" stop-sign=","/>
<str id="position" stop-sign=","/>
<str id="name4" db-column-name="name" s="employeeFirstName" stop-sign=","/>
<str id="name5" db-column-name="name2" s="employeeLastName" stop-sign=","/>
<str id="telephone2" db-column-name="telephone" s="telephoneUS" stop-sign=","/>
</elem>
</seq>
</dfasdl>8.1.3. Use cases
A DFASDL describes different data structures that are based on files or databases.
| Depending on the use case, a DFASDL can be used for a database and a file structure. |
CSV file with personal data
The data are separated via comma in the CSV file.
John,Doe,john.doe@example.com,24.12.0000,+49 123 456789,Sales
Jane,Doe,jane.doe@example.com,23.12.1971,+1 555 897652,Marketing
Jake,Doe,jake.doe@example.com,1.1.1984,+23 987 123444,Development<?xml version="1.0" encoding="UTF-8"?>
<dfasdl xmlns="http://www.dfasdl.org/DFASDL" semantic="custom">
<seq id="persons">
<elem id="row">
<str id="lastname" stop-sign=","/>
<str id="firstname" stop-sign=","/>
<formatstr format="(.*@.*\..*)" id="email" stop-sign=","/>
<formattime format="dd.MM.yyyy" id="birthday" stop-sign=","/>
<str id="phone" stop-sign=","/>
<str id="division"/>
</elem>
</seq>
</dfasdl>CSV file with variations (choices)
The following DFASDL contains a sequence that has three elements per line. Every element can be numerical or a character string.
01;Fritz;Mustermann
02;Max;12345<?xml version="1.0" encoding="UTF-8"?>
<dfasdl xmlns="http://www.dfasdl.org/DFASDL" semantic="custom">
<seq id="test">
<elem id="account_list">
<choice id="field1">
<celem id="field1-container-1">
<num stop-sign=";" id="num-field1"/>
</celem>
<celem id="field1-container-2">
<str stop-sign=";" id="str-field1"/>
</celem>
</choice>
<choice id="field2">
<celem id="field2-container-1">
<num stop-sign=";" id="num-field2"/>
</celem>
<celem id="field2-container-2">
<str stop-sign=";" id="str-field2"/>
</celem>
</choice>
<choice id="field3">
<celem id="field3-container-1">
<num id="num-field3"/>
</celem>
<celem id="field3-container-2">
<str id="str-field3"/>
</celem>
</choice>
</elem>
</seq>
</dfasdl>A E-Mail can be described with a DFASDL. Some of the header values are described with the help of a choice.
Return-Path: <sender@sender.com>
Delivered-To: receiver@receiver.com
Received: from smtp41.gate.dfw1a (smtp41.gate.dfw1a.rsapps.net [172.20.100.41])
    by store130a.mail.dfw1a (SMTP Server) with ESMTP id 581391D80A2
    for <receiver@receiver.com>; Mon, 28 Apr 2014 04:27:08 -0400 (EDT)
X-Virus-Scanned: OK
X-MessageSniffer-Scan-Result: 0
X-MessageSniffer-Rules: 0-0-0-4292-c
X-CMAE-Scan-Result: 0
X-CNFS-Analysis: v=2.1 cv=XfmwkuJ5 c=1 sm=0 tr=0 a=E3KZ53FmvAFxQtyWo729Vw==:117 a=E3KZ53FmvAFxQtyWo729Vw==:17 a=OTleaX3xBfsA:10 a=wPDyFdB5xvgA:10 a=kj9zAlcOel0A:10 a=80MYoa46AAAA:8 a=GF4HiIEFAAAA:8 a=9ro_oHBkAAAA:8 a=gFun6ocCyU8A:10 a=x-Bl-83-i81MCIlInGwA:9 a=CjuIK1q_8ugA:10
Received: from [173.203.187.63] ([173.203.187.63:33992] helo=smtp12.relay.iad3a.emailsrvr.com)
    by smtp41.gate.dfw1a.rsapps.net (envelope-from <sender@sender.com>)
    (ecelerity 2.2.3.49 r(42060/42061)) with ESMTPS (cipher=AES256-SHA)
    id 28/29-26985-CD01E535; Mon, 28 Apr 2014 04:27:08 -0400
Received: from localhost (localhost.localdomain [127.0.0.1])
    by smtp12.relay.iad3a.emailsrvr.com (SMTP Server) with ESMTP id B1F22F0148;
    Mon, 28 Apr 2014 04:27:07 -0400 (EDT)
X-Virus-Scanned: OK
Received: by smtp12.relay.iad3a.emailsrvr.com (Authenticated sender: sender-AT-sender.com) with ESMTPSA id 33E03F0145;
    Mon, 28 Apr 2014 04:27:06 -0400 (EDT)
Date: Mon, 28 Apr 2014 10:27:06 +0200
From: Sender <sender@sender.com>
To: =?ISO-8859-1?Q?Andr=E9_Sch=FCtz?= <receiver@receiver.com>
Cc: Sender <sender@sender.com>
Subject: This is a test subject!
Message-Id: <20140428102706.0477e42d9e210a5c90583026@receiver.com>
Organization: Organization
X-Mailer: Sylpheed 3.4.1 (GTK+ 2.24.22; amd64-portbld-freebsd9.2)
Mime-Version: 1.0
Content-Type: text/plain; charset=US-ASCII
Content-Transfer-Encoding: 7bit

Hi there,

lorem ipsum dolor sit amet, consetetur sadipscing elitr, sed diam
nonumy eirmod tempor invidunt ut labore et dolore magna aliquyam erat,
sed diam voluptua. At vero eos et accusam et justo duo dolores et ea
rebum. Stet clita kasd gubergren, no sea takimata sanctus est Lorem
ipsum dolor sit amet. Lorem ipsum dolor sit amet, consetetur sadipscing
elitr, sed diam nonumy eirmod tempor invidunt ut labore et dolore magna
aliquyam erat, sed diam voluptua. At vero eos et accusam et justo duo
dolores et ea rebum. Stet clita kasd gubergren, no sea takimata sanctus
est Lorem ipsum dolor sit amet.

Lorem ipsum dolor sit amet, consetetur sadipscing elitr, sed diam
nonumy eirmod tempor invidunt ut labore et dolore magna aliquyam erat,
sed diam voluptua. At vero eos et accusam et justo duo dolores et ea
rebum. Stet clita kasd gubergren, no sea takimata sanctus est Lorem
ipsum dolor sit amet. Lorem ipsum dolor sit amet, consetetur sadipscing
elitr, sed diam nonumy eirmod tempor invidunt ut labore et dolore magna
aliquyam erat, sed diam voluptua. At vero eos et accusam et justo duo
dolores et ea rebum. Stet clita kasd gubergren, no sea takimata sanctus
est Lorem ipsum dolor sit amet.

Regards,

Cicero

--
28. Ostermond 2014, 10:26<?xml version="1.0" encoding="UTF-8"?>
<dfasdl xmlns="http://www.dfasdl.org/DFASDL" semantic="custom">
<seq id="headers" stop-sign="[\r\n][\r\n]">
<choice id="header">
<celem id="date">
<str class="label" start-sign="Date" stop-sign=":"/>
<str id="dateValue" trim="both"/>
</celem>
<celem id="from">
<str class="label" start-sign="From" stop-sign=":"/>
<str id="fromValue" trim="both"/>
</celem>
<celem id="to">
<str class="label" start-sign="To" stop-sign=":"/>
<str id="toValue" trim="both"/>
</celem>
<celem id="cc">
<str class="label" start-sign="Cc" stop-sign=":"/>
<str id="ccValue" trim="both"/>
</celem>
<celem id="subject">
<str class="label" start-sign="Subject" stop-sign=":"/>
<str id="subjectValue" trim="both"/>
</celem>
<celem id="messageId">
<str class="label" start-sign="Message-Id" stop-sign=":"/>
<str id="messageIdValue" trim="both"/>
</celem>
<celem id="genericHeaderMultiLine">
<str class="label" stop-sign=":"/>
<str id="genericHeaderMultiLineValue" stop-sign="[\r\n][\w|[\r\n]]" correct-offset="-1" trim="both"/>
</celem>
</choice>
</seq>
<str id="body" stop-sign="EOF"/>
</dfasdl>| By using a choice, the header values can be described in an arbitrary order. |
Text
A text with specific parts.
Lorem ipsum dolor sit amet,
consetetur sadipscing elitr,
sed diam nonumy eirmod tempor invidunt ut labore et dolore magna aliquyam erat,
sed diam voluptua.

At vero eos et accusam et justo duo dolores et ea rebum. Stet clita kasd gubergren, no sea takimata sanctus est Lorem ipsum dolor sit amet. Lorem ipsum dolor sit amet, consetetur sadipscing elitr, sed diam nonumy eirmod tempor invidunt ut labore et dolore magna aliquyam erat, sed diam voluptua. At vero eos et accusam et justo duo dolores et ea rebum. Stet clita kasd gubergren, no sea takimata sanctus est Lorem ipsum dolor sit amet.<?xml version="1.0" encoding="UTF-8"?>
<dfasdl xmlns="http://www.dfasdl.org/DFASDL" semantic="custom">
<seq id="headers" stop-sign="\A$">
<elem id="row">
<str id="content"/>
</elem>
</seq>
<str id="footer" stop-sign="EOF"/>
</dfasdl>| The Example-DFASDL reads the first 4 lines as sequence and stops at the empty line. The rest of the text is read until the parser reaches the end of the file. |
| The element with the ID content has no stop-sign and uses the default stop-sign that is represented by the end of a line. |
vCard
Read the single elements of a vCard.
BEGIN:VCARD
VERSION:3.0
N:Mustermann;Max;Mr.
FN:Max Mustermann
ORG:Bubba Shrimp Co.
TITLE:Shrimp Man
PHOTO;VALUE=URL;TYPE=GIF:http://www.example.com/dir_photos/my_photo.gif
TEL;TYPE=WORK,VOICE:(111) 555-1212
TEL;TYPE=HOME,VOICE:(404) 555-1212
ADR;TYPE=WORK:;;100 Waters Edge;Baytown;LA;30314;United States of America
LABEL;TYPE=WORK:100 Waters Edge\nBaytown, LA 30314\nUnited States of America
ADR;TYPE=HOME:;;42 Plantation St.;Baytown;LA;30314;United States of America
LABEL;TYPE=HOME:42 Plantation St.\nBaytown, LA 30314\nUnited States of America
EMAIL;TYPE=PREF,INTERNET:maxmustermann@example.com
REV:2008-04-24T19:52:43Z
END:VCARD<?xml version="1.0" encoding="UTF-8"?>
<dfasdl xmlns="http://www.dfasdl.org/DFASDL" semantic="custom">
<elem id="vcard">
<str class="label" stop-sign=":"/>
<str id="start_tag" />
<str class="label" stop-sign=":"/>
<str id="version"/>
<str class="label" stop-sign=":"/>
<str id="name"/>
<str class="label" stop-sign=":"/>
<str id="full_name"/>
<str class="label" stop-sign=":"/>
<str id="organisation"/>
<str class="label" stop-sign=":"/>
<str id="title"/>
<str class="label" stop-sign=":"/>
<str id="photo"/>
<str class="label" stop-sign=":"/>
<str id="phone_work"/>
<str class="label" stop-sign=":"/>
<str id="phone_home"/>
<str class="label" stop-sign=":"/>
<str id="address_work"/>
<str class="label" stop-sign=":"/>
<str id="label_work"/>
<str class="label" stop-sign=":"/>
<str id="address_home"/>
<str class="label" stop-sign=":"/>
<str id="label_home"/>
<str class="label" stop-sign=":"/>
<str id="email"/>
<str class="label" stop-sign=":"/>
<str id="revision"/>
<str class="label" stop-sign=":"/>
<str id="end_tag"/>
</elem>
</dfasdl>JSON
Integrate the elements of a JSON file.
{
  "house": {
    "street": "Musterstreet",
    "number": "3",
    "apartments": 7,
    "value": "2300000.00",
    "size": [
      15,
      30,
      45
    ],
    "costs": 15345.55
  },
  "persons": [
    {
      "name": {
        "firstname": "Max",
        "lastname": "Mustermann"
      },
      "birthday": "1997-03-21",
      "telephone": "0176123456",
      "apartment": 2,
      "lastPay": "2015-11-02 12:34:55",
      "other": [
        "parking slot",
        "extra room"
      ]
    },
    {
      "name": {
        "firstname": "Eva",
        "lastname": "Musterfrau"
      },
      "birthday": "1997-04-01",
      "telephone": "0176987654321",
      "apartment": 4,
      "lastPay": "2015-11-01 12:34:55",
      "other": [
        "extra room"
      ]
    }
  ]
}<?xml version="1.0" encoding="UTF-8" standalone="no"?>
<dfasdl xmlns="http://www.dfasdl.org/DFASDL" semantic="custom">
<elem id="root">
<elem id="house" json-attribute-name="house">
<str id="house-street" json-attribute-name="street"/>
<num id="house-number" json-attribute-name="number"/>
<num id="house-apartments" json-attribute-name="apartments"/>
<formatnum decimal-separator="." format="(-?[\d\.,⎖]+)" id="house-value" json-attribute-name="value" max-digits="36" max-precision="2"/>
<elem id="house-size" json-attribute-name="size">
<seq id="house-size-seq" keepID="true">
<elem id="house-size-seq-row">
<num id="house-size-seq-row-element"/>
</elem>
</seq>
</elem>
<formatnum decimal-separator="." format="(-?[\d\.,⎖]+)" id="house-costs" json-attribute-name="costs" max-digits="36" max-precision="2"/>
</elem>
<elem id="persons" json-attribute-name="persons">
<seq id="persons-seq" keepID="true">
<elem id="persons-seq-row">
<elem id="persons-seq-row-name" json-attribute-name="name">
<str id="persons-seq-row-firstname" json-attribute-name="firstname"/>
<str id="persons-seq-row-lastname" json-attribute-name="lastname"/>
</elem>
<date id="persons-seq-row-birthday" json-attribute-name="birthday"/>
<num id="persons-seq-row-telephone" json-attribute-name="telephone"/>
<num id="persons-seq-row-apartment" json-attribute-name="apartment"/>
<datetime id="persons-seq-row-lastpay" json-attribute-name="lastPay"/>
<elem id="persons-seq-row-other" json-attribute-name="other">
<seq id="persons-seq-row-other-seq" keepID="true">
<elem id="persons-seq-row-other-seq-row">
<str id="persons-seq-row-other-seq-row-element"/>
</elem>
</seq>
</elem>
</elem>
</seq>
</elem>
</elem>
</dfasdl>XML
Integrate the elements of a XML file.
<?xml version="1.0" encoding="UTF-8"?>
<rows>
  <row>
    <firstname>Albert</firstname>
    <lastname>Einstein</lastname>
    <email>albert.einstein@example.com</email>
    <birthday>1879-03-14</birthday>
    <awards>
      <award>
        <year>1914</year>
        <name>Ordentliches Mitglied der Preußischen Akademie der Wissenschaften</name>
      </award>
      <award>
        <year>1917</year>
        <name>Ehrenpreis der Peter-Wilhelm-Müller-Stiftung</name>
      </award>
      <award>
        <year>1919</year>
        <name>Ehrendoktorwürde (Dr. h.c.) der Universität Rostock</name>
      </award>
    </awards>
  </row>
  <row>
    <firstname>Bernhard</firstname>
    <lastname>Riemann</lastname>
    <email>br@example.com</email>
    <birthday>1826-09-17</birthday>
    <awards>
      <award>
        <year>1868</year>
        <name>Riemann-Helmholtz-Raumproblem</name>
      </award>
    </awards>
  </row>
  <row>
    <firstname>Johann Carl Friedrich</firstname>
    <lastname>Gauß</lastname>
    <email>gauss@example.com</email>
    <birthday>1777-04-30</birthday>
    <awards/>
  </row>
  <row>
    <firstname>Johann Benedict</firstname>
    <lastname>Listing</lastname>
    <email>bl@example.com</email>
    <birthday>1808-07-25</birthday>
    <awards>
      <award>
        <year>1858</year>
      </award>
      <award>
        <year>1861</year>
        <name>Mitglied Akademie der Wissenschaften in Göttingen</name>
      </award>
    </awards>
  </row>
  <row>
    <firstname>Gottfried Wilhelm</firstname>
    <lastname>Leibnitz</lastname>
    <email>leibnitz@example.com</email>
    <birthday>1646-07-01</birthday>
    <awards>
      <award>
        <name>Gottfried-Wilhelm-Leibniz-Preis</name>
      </award>
      <award>
        <year>2008</year>
        <name>Denkmal in Hannover</name>
      </award>
    </awards>
  </row>
</rows><?xml version="1.0" encoding="UTF-8"?>
<dfasdl xmlns="http://www.dfasdl.org/DFASDL"
semantic="niem">
<seq id="rows">
<elem id="row">
<str id="firstname"/>
<str id="lastname"/>
<str id="email"/>
<str id="birthday"/>
<seq id="awards">
<choice id="bad-award-data">
<celem id="award-complete">
<num id="award-complete-year" xml-element-name="year"/>
<str id="award-complete-name" xml-element-name="name"/>
</celem>
<celem id="award-year-only">
<num id="award-year-only-year" xml-element-name="year"/>
</celem>
<celem id="award-name-only">
<str id="award-name-only-name" xml-element-name="name"/>
</celem>
</choice>
</seq>
</elem>
</seq>
</dfasdl>JOIN between multiple tables
If you want to create a JOIN between multiple tables, the db-select attribute
is a simple alternative.
<?xml version="1.0" encoding="UTF-8" standalone="no"?>
<dfasdl xmlns="http://www.dfasdl.org/DFASDL" semantic="custom">
  <seq id="people" db-select="SELECT t1.name, firstname, title, telephone, t2.name AS productname FROM `people` AS t1, `products` AS t2 WHERE t1.pid = t2.pid">
    <elem id="people_row">
      <str db-column-name="name" id="people_row_name" max-length="12"/>
      <str db-column-name="firstname" id="people_row_firstname" max-length="9"/>
      <str db-column-name="title" id="people_row_title" max-length="22"/>
      <str db-column-name="telephone" id="people_row_telephone" max-length="14"/>
      <str db-column-name="productname" id="productname"/>
    </elem>
  </seq>
</dfasdl>
Filtering of source data
If not all source data should be used then you can limit them via the
attribute filter.
Special characters that may lead to problems with XML like <
and & for example must be escaped properly!
|
<?xml version="1.0" encoding="UTF-8" standalone="no"?>
<dfasdl xmlns="http://www.dfasdl.org/DFASDL" semantic="custom">
<seq id="people" filter="salary < 2000 AND product_price > 4000">
<elem id="people_row">
<str db-column-name="name" id="people_row_name" max-length="12"/>
<str db-column-name="firstname" id="people_row_firstname" max-length="9"/>
<str db-column-name="title" id="people_row_title" max-length="22"/>
<str db-column-name="telephone" id="people_row_telephone" max-length="14"/>
<num db-column-name="salary" id="people_row_salary"/>
<str db-column-name="productname" id="productname"/>
<num db-column-name="product_price" id="productprice"/>
</elem>
</seq>
</dfasdl>8.1.4. Recommended approach for attributes
The following approaches are useful for attributes.
decimal-separator
Number with variable decimal places
<formatnum id="ID" decimal-separator="." format="-?\d+\.\d*" max-digits="34"
max-precision="2"/>
stop-sign
Match an empty line
stop-sign="^$"Match a wrap that is followed by a word character
stop-sign="[\r\n][\w|[\r\n]]"Stop a sequence when an empty line is found
<seq stop-sign="\A$" id="SEQ-ID">